I’m a big fan of Notion. It’s a great piece of software capable of doing countless things — from simple note-taking, habit tracking and Getting Things Done all the way to fully managing the work at a startup. Since May 2021 developers gained access to the beta version of Notion API. It opened up the world of possibilities and already there’re thousands of integrations, for example through Zapier or automate.io.
What we will create
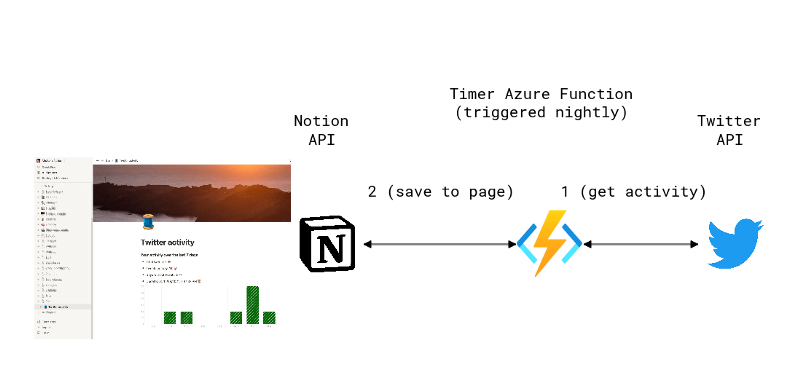
In this tutorial, we’ll use a serverless Typescript Azure Function to periodically get data from the Twitter API (amount of tweets per day) and then put it into a page in Notion through the Notion API. Hopefully, this will be a good starter for anyone who’d like to start using Notion API, serverless functions or both 🚀
Here’s a simple diagram of the solution we’ll create (the visual was made with Cloud Skew, which I really recommend for drawing anything Azure related).

What you’ll learn
- How to integrate with Notion API and Twitter API with Typescript and Node
- How to create a Typescript Azure Function which will execute periodically (a timer function)
- How to generate a chart using QuickChart and how to upload it to Azure Blob Storage
Create Azure Function project with a Timer function
Make sure you have the correct tooling installed, you can find the details in this Microsoft tutorial. After doing that, use the following commands to create the project:
mkdir
func new --name GenerateNotionPageTimerFunction --template "Timer trigger"
You’ll be asked about the runtime and language — select Node and Typescript. After confirming, the project structure with 1 CRON based function will be created.
Creating resources in Azure
Our app will run in Azure’s cloud and before deploying it there, we need to spin up a few resources. It’s possible to do in a few ways, I usually do it with Azure CLI, as it’s way faster than doing it in the Azure Portal, also easy to automate and share. You can find the detailed instructions here (check it out in case of trouble).
First log in with:
az login
Then we need to create a resource group, which is basically a named bag for resources — it’s handy to keep all of the related resources (so apps, storage, analytics etc) in one resource group, as it makes management easier:
az group create --name RESOURCE_GROUP_NAME --location germanywestcentral
Azure Functions projects need to be connected to a Storage account due to triggers, logging and other operations (more details here), that’s why you need to create a new Storage account:
az storage account create --name STORAGE_ACCOUNT_NAME --location germanywestcentral --resource-group RESOURCE_GROUP_NAME --sku Standard_LRS
Finally, we can create the Azure Functions app itself. As you see in the parameters below, we’ll go with Node 14, Azure Functions v4 and we’ll use the storage account created before.
az functionapp create --resource-group RESOURCE_GROUP_NAME --consumption-plan-location germanywestcentral --runtime node --runtime-version 14 --functions-version 4 --name FUNCTIONS_APP_NAME --storage-account STORAGE_ACCOUNT_NAME
Our timer trigger function
Below is the code for the Azure Function which will be executed periodically — check out the full file on GitHub here.
As you can see, it first creates the notion client based on an API token (more on getting it later). Before doing so, make sure to add the official Notion SDK JSpackage:
npm install
By default, the function is executed every 5 minutes. This is defined in the function.json file:
"schedule": "0 */5 * * * *"
Let’s change it, so that it runs every night at 2 AM while we’re asleep (or not — no judgment from my side ✨):
"schedule": "0 0 2 * * * "
If you’d like to see more examples of scheduling timer Azure Functions, take a look at this great cheatsheet prepared by Armin Reiter.
Now, let’s dive deeper into the functions 🤿⬇️
Preparing the page with Notion API
As I mentioned already, if the Twitter activity page was created already by the past invocation, we want to reuse it and just populate it with new data from Twitter. To find out if the page is already there, we can use the POST /search API method to look for a page with a given title.
If the page doesn’t exist, we create a new one with the POST /pages method. In the payload, we specify the parent page, the title, icon and cover image.
If the page does exist, we prepare it by removing all of its blocks. We could update them, but this would be a bit more complicated (feel free to try it out!). Before removing the blocks, we first need to get their ids. We can do it by listing all of the blocks for a given page with the GET blocks/block_id/children method. We then remove all of them by calling the DELETE blocks/block_id method for each block.
Getting recent tweets from Twitter
We’d like to get the number of tweets for a given account per day in the last week. Luckily, Twitter’s API provides a method that does that pretty much out of the box — GET tweets/counts/recent. We call with granularity set to ‘day’ and bingo, we get exactly what we want:
{
  data: \[
    {
      end: '2021-12-21T00:00:00.000Z',
      start: '2021-12-20T21:53:58.000Z',
      tweet\_count: 2
    },
    {
      end: '2021-12-22T00:00:00.000Z',
      start: '2021-12-21T00:00:00.000Z',
      tweet\_count: 3
    },
    ...
  \],
  meta: { total\_tweet\_count: 11 }
}
Creating a chart and uploading it to Azure Blob Storage
To create a chart, I’ve decided to go with QuickChart. It’s a super cool product that allows you to generate charts with simple HTTP GET requests. All of the things like data, labels, chart customisations etc are specified in the URL, so that it looks like this:
https://quickchart.io/chart?c={type:'bar',data:{labels:\['Q1','Q2','Q3','Q4'\], datasets:\[{label:'Users',data:\[50,60,70,180\]},{label:'Revenue',data:\[100,200,300,400\]}\]}}
The bad news is that we can not use the chart URL above as an image source in Notion, as Notion API requires all of the images to end with an image extension. Because of that, we need to first generate the chart URL, then download it and store it in Azure Blob Storage. The good news is that we don’t have to create these URLs by hand — there’s an npm package called quickchart-js which allows us to configure the chart easily in code. Just add it to the project with:
npm install quickchart-js
And then generate the chart like below:
We then prepare the Blob Storage by creating a container (if it does not exist) and we’re ready to upload the chart as a pngimage. Make sure to install the needed package:
npm install @azure/storage-blob
For the sake of keeping things simple, we’ll make the container publicly available, thanks to which the link to the image will not contain a SAS token (learn more about handling these in my other post -> Handling expired Azure Blob Storage links in a user-friendly way).
Populating the paget through Notion API with Twitter data
We have all of the data prepared, we now have to add it to the Notion page which we’ve prepared before. We’ll do that with the PATCH /blocks/block_id/children method by specifying all of the blocks which we want to add:
See this Notion API documentation page to see the list of currently supported blocks. As you see, we’ve only used the heading, bulleted list items and the image blocks.
Setting up secrets and variables
As you’ve seen in the code, in a few places we retrieve process env values:
const notionClient = new Client({ auth: process.env\["NOTION\_API\_TOKEN"\] })
These values will be unique for your project and you’ll need to fill them in before running the whole app. When Azure Functions are running locally, the values come from the local.settings.json file. When the app is deployed to the cloud, the values reside in app’s Configuration. You can manage them in the Azure Portal or do it from the Azure CLI, which again is my preferred method.
You should prepare values for these 6 secrets:
NOTION_API_TOKEN
You need to generate it on the Notion website, see my other article which describes it in detail
NOTION_PAGE_ID
This is the ID of the parent page to the page our code creates. You can get it from the page share link (it’s included in the URL and looks like this — 512227bf02814bc026cf0e7486539b25)
TWITTER_USER_NAME
For me it’s michal_creates
TWITTER_USER_TOKEN
It’s a Bearer token that you need to generate on Twitter Developer account, see here for details, it looks like this: “AAAAAAAAAAAAAAAAAAAAAPMgXQEAAAAAiVS (…)”
STORAGE_ACCOUNT_NAME
Name of your storage account, so whatever you’ve replaced STORAGE_ACCOUNT_NAME with a few sections before when creating the account
STORAGE_ACCOUNT_KEY
The key to your storage account, you can easily get it with the command below (copy the value of the “value” field from the response):
az storage account keys list — account-name STORAGE\_ACCOUNT\_NAME
We can now upload these secrets to the configuration of your Function App in Azure with the following command:
az functionapp config appsettings set — name FUNCTIONS\_APP\_NAME — resource-group RESOURCE\_GROUP\_NAME — settings NAME\_OF\_CONFIGURATION\_VARIABLE=VALUE
You need to do it for each of the 6 secrets from the table above. After you’re done, you can use the command below to get all of the configuration values from Azure to your local.settings.json file, which will allow you to test the app locally.
func azure functionapp fetch-app-settings FUNCTIONS\_APP\_NAME
Disclaimer — we’re storing the secrets in the Configuration, as it’s simple enough for the sake of this tutorial. If you’re considering using this code for more serious tasks, I suggest you take a look at Azure Key Vault, which provides more security.
Testing locally
Code is ready, local secrets are in place, finally, we can test the whole solution ✨ Before starting up the app, I advise you to change the schedule of the function, so that it runs every 15 seconds (do it in the function.json file):
"schedule": "\*/15 \* \* \* \* \*"
Let’s run the app locally with:
npm install
npm start
If things went as planned, you should see logs similar to these:
Azure Functions Core Tools
Core Tools Version:       4.0.3971 Commit hash: d0775d487c93ebd49e9c1166d5c3c01f3c76eaaf  (64-bit)
Function Runtime Version: 4.0.1.16815

\[20:27:09\] Found 0 errors. Watching for file changes.

info: Microsoft.AspNetCore.Hosting.Diagnostics\[1\]
      Request starting HTTP/2 POST [http://127.0.0.1:62631/AzureFunctionsRpcMessages.FunctionRpc/EventStream](http://127.0.0.1:62631/AzureFunctionsRpcMessages.FunctionRpc/EventStream) application/grpc -

Functions:

        GenerateNotionPageTimerFunction: timerTrigger
For detailed output, run func with –verbose flag.
info: Microsoft.AspNetCore.Routing.EndpointMiddleware\[0\]
Executing endpoint 'gRPC - /AzureFunctionsRpcMessages.FunctionRpc/EventStream'
\[2021-12-28T19:27:11.854Z\] Worker process started and initialized.
\[2021-12-28T19:27:15.120Z\] Executing 'Functions.GenerateNotionPageTimerFunction' (Reason='Timer fired at 2021-12-28T20:27:15.0370240+01:00', Id=538d444c-18d2-4ada-af26-df3b839d44d5)
\[2021-12-28T19:27:16.182Z\] Host lock lease acquired by instance ID '0000000000000000000000007495A8FA'.
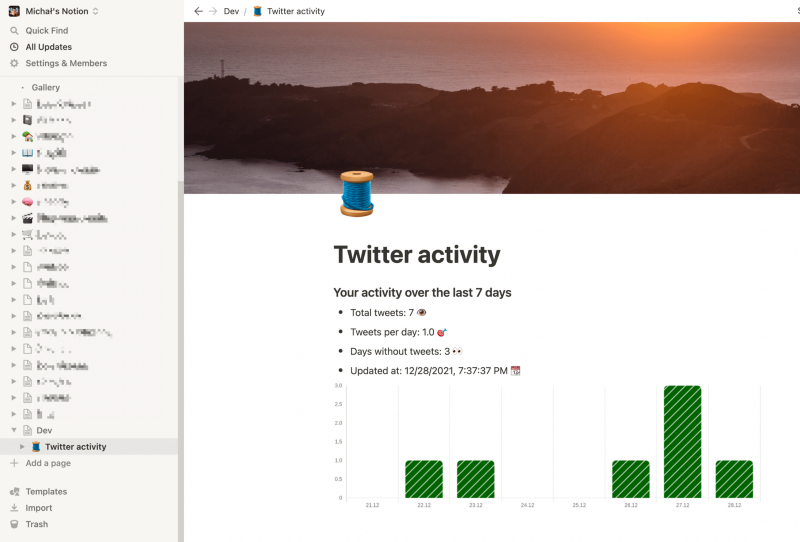
\[2021-12-28T19:27:16.183Z\] Page 'Twitter activity' does not exist yet, creating it...
\[2021-12-28T19:27:17.651Z\] Downloaded info about 7 tweets from last 7 days
\[2021-12-28T19:27:18.428Z\] Generated chart and uploaded it to the Blob Storage - [https://notionafmiszu.blob.core.windows.net/charts/chart\_1640719637842.png](https://notionafmiszu.blob.core.windows.net/charts/chart_1640719637842.png)
\[2021-12-28T19:27:19.729Z\] Done
\[2021-12-28T19:27:19.786Z\] Executed 'Functions.GenerateNotionPageTimerFunction' (Succeeded, Id=538d444c-18d2-4ada-af26-df3b839d44d5, Duration=4732ms)
\[2021-12-28T19:27:30.023Z\] Executing 'Functions.GenerateNotionPageTimerFunction' (Reason='Timer fired at 2021-12-28T20:27:30.0133660+01:00', Id=dfe7b416-79bf-4e19-b80c-bcc915273eb6)
\[2021-12-28T19:27:32.018Z\] Page 'Twitter activity' exists already (471bfb7a-ee0a-4bf4-8133-ed896623aacd), removing 6 blocks...
\[2021-12-28T19:27:39.797Z\] Downloaded info about 7 tweets from last 7 days
\[2021-12-28T19:27:40.270Z\] Generated chart and uploaded it to the Blob Storage - [https://notionafmiszu.blob.core.windows.net/charts/chart\_1640719659835.png](https://notionafmiszu.blob.core.windows.net/charts/chart_1640719659835.png)
\[2021-12-28T19:27:41.444Z\] Done
\[2021-12-28T19:27:41.450Z\] Executed 'Functions.GenerateNotionPageTimerFunction' (Succeeded, Id=dfe7b416-79bf-4e19-b80c-bcc915273eb6, Duration=11435ms)
Awesome! If you open Notion now, you should see the page with your Twitter activity 🔥
Make sure to revert the change to the execution frequency — we do not want the function to run that often in the cloud.
Azure deployment
The deployment is straightforward, as we’ve done all of the hard work (creating resources, setting up secrets) before. Run these 2 commands:
npm run build:production
func azure functionapp publish FUNCTIONS\_APP\_NAME
And that’s it, you should see the name of your timer function in the output. Hopefully, when you wake up the next day, you’ll see the Notion page updated 🎉
Cleaning up
After you’re done testing things out, make sure to remove the Azure resources. You don’t want to pay for stuff that you don’t really use. You can easily remove the whole resource group with the following command
az group delete --name RESOURCE\_GROUP\_NAME
Let me know if you’d have any issues or questions with integrating Notion, Azure Functions and Twitter together, I’d be happy to help! Feel free to reach out on Twitter: @michal_creates